
Trigger Handler Pattern in Apex Salesforce is one of the most effective techniques for keeping your trigger logic clean, scalable, and easy to maintain. As your Salesforce org grows and automation layers expand, writing all logic directly in triggers becomes messy fast. This guide explains how to implement the Trigger Handler Pattern, why it matters, and how it improves performance and readability in large-scale projects.
For teams maintaining complex orgs, mastering the Trigger Handler Pattern in Apex Salesforce prevents brittle code and keeps deployments smooth across multiple releases.
Introduction
Salesforce is known for its flexibility and powerful automation capabilities. However, as systems evolve, the complexity of custom logic often increases, making it difficult to maintain clean and efficient Apex triggers. Poorly structured code can slow down development, increase the risk of bugs, and even break critical business processes during deployments.
The Trigger Handler Pattern in Apex Salesforce was created to solve exactly this problem — by separating business logic from trigger definitions, developers gain clarity, modularity, and easier testing. In this article, we’ll cover the pattern’s fundamentals, common pitfalls it solves, and how to implement it with real examples.
The Problem with Complex Triggers
Triggers are a great way to execute code automatically when certain database operations occur — such as creating, updating, or deleting records. However, as logic grows, unstructured triggers quickly become a maintenance nightmare. You’ve probably seen triggers where hundreds of lines mix business rules, queries, and DML operations in a single block of code. This leads to:
- Low readability: Difficult for new developers to understand.
- Testing challenges: Unit tests become complex and fragile.
- Governor limit risks: Repeated queries or DML statements trigger runtime exceptions.
- Hard-to-track dependencies: One small change can affect multiple business processes.
To overcome these issues, experienced developers follow a clean architecture approach — and that’s where the Trigger Handler Pattern comes in.
What Is the Trigger Handler Pattern?
The Trigger Handler Pattern in Apex Salesforce is a design pattern that delegates the actual business logic of a trigger to a dedicated Apex class, commonly called a Handler. Instead of writing all your logic inside the trigger itself, you create methods in a separate class that handle each operation. This keeps the trigger small and easy to understand while allowing your logic to scale independently.
In essence, the trigger’s role becomes simple: detect the event (insert, update, delete, etc.) and call the correct method from the handler. The handler class takes care of the actual processing. This pattern improves maintainability, promotes modularity, and ensures your code remains bulk-safe — meaning it can handle thousands of records efficiently without exceeding Salesforce limits.
Trigger Handler Pattern in Apex Salesforce: Key Benefits
- Cleaner triggers: Triggers contain only event routing, not business logic.
- Reusable logic: Handler methods can be reused across multiple triggers or processes.
- Easy testing: Handlers can be tested directly with unit tests without invoking triggers.
- Scalability: Adding new functionality becomes easier and less risky.
- Compliance with best practices: Reduces technical debt and improves code review efficiency.
In large implementations — for example, enterprise Salesforce orgs with multiple development teams — this pattern is almost mandatory to maintain structure and stability. It’s also a best practice recommended by Salesforce’s official Apex Enterprise Patterns module on Trailhead.
Implementing the Trigger Handler Pattern
Let’s explore how to implement the Trigger Handler Pattern in Apex Salesforce on the Account object and why this structure dramatically improves scalability. By centralizing logic in a handler, the Trigger Handler Pattern in Apex Salesforce keeps business rules consistent, testable, and bulk-safe.
Scenario
- When an account’s AnnualRevenue exceeds $1,000,000, set its Industry to “Technology.”
- Log a record in a custom object (
Account_Log__c) whenever a new account is created.
Before Refactoring – A Simple Trigger
trigger AccountTrigger on Account (before insert, before update) {
    for (Account acc : Trigger.new) {
        if (acc.AnnualRevenue > 1000000) {
            acc.Industry = 'Technology';
        }
    }

    if (Trigger.isInsert) {
        List<Account_Log__c> logs = new List<Account_Log__c>();
        for (Account acc : Trigger.new) {
            logs.add(new Account_Log__c(Name = 'Account Created: ' + acc.Name));
        }
        insert logs;
    }
}
After Refactoring – Using a Handler
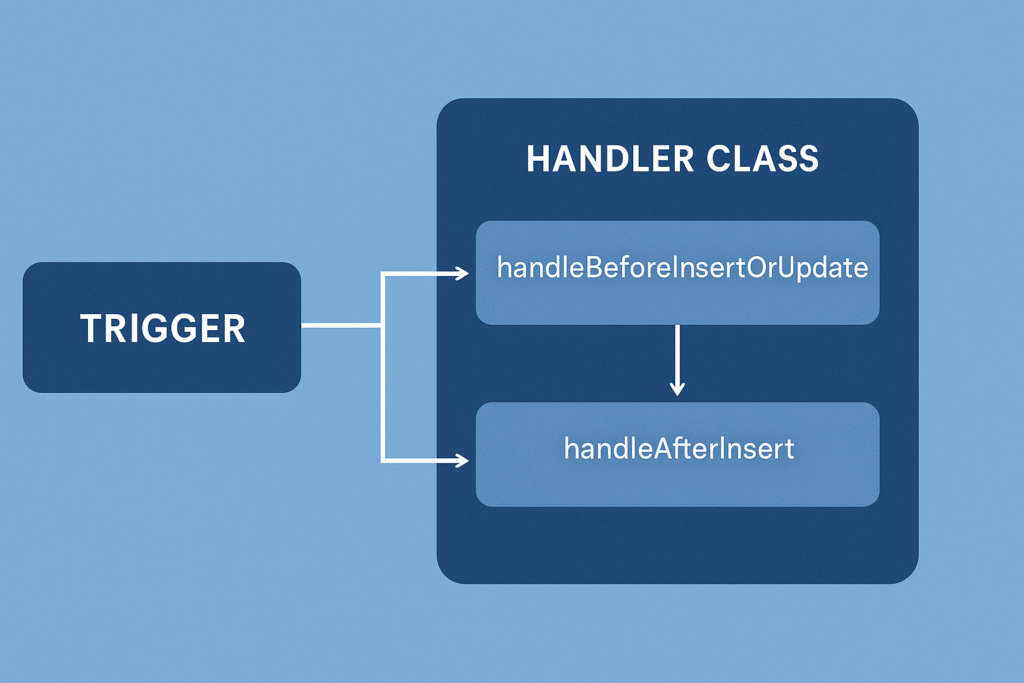
trigger AccountTrigger on Account (before insert, before update, after insert) {
    AccountTriggerHandler handler = new AccountTriggerHandler();

    if (Trigger.isBefore) {
        if (Trigger.isInsert || Trigger.isUpdate) {
            handler.handleBeforeInsertOrUpdate(Trigger.new);
        }
    }

    if (Trigger.isAfter && Trigger.isInsert) {
        handler.handleAfterInsert(Trigger.new);
    }
}
In practice, the Trigger Handler Pattern in Apex Salesforce routes events to focused methods, reducing noise in the trigger and making unit tests faster and clearer.
Handler Class Implementation
public class AccountTriggerHandler {

    public void handleBeforeInsertOrUpdate(List<Account> accounts) {
        for (Account acc : accounts) {
            if (acc.AnnualRevenue > 1000000) {
                acc.Industry = 'Technology';
            }
        }
    }

    public void handleAfterInsert(List<Account> accounts) {
        List<Account_Log__c> logs = new List<Account_Log__c>();
        for (Account acc : accounts) {
            logs.add(new Account_Log__c(Name = 'Account Created: ' + acc.Name));
        }
        insert logs;
    }
}
Why the Trigger Handler Pattern in Apex Salesforce Scales
Adopting the Trigger Handler Pattern in Apex Salesforce alongside clear naming and recursion control standardizes development across teams and projects. It’s a lightweight but powerful pattern that supports growth and long-term maintainability.
Best Practices for Trigger Handler Design
- Use one handler class per object for clarity and maintainability.
- Avoid complex logic inside triggers; keep them focused on routing only.
- Always respect Salesforce governor limits using bulk-safe patterns.
- Control recursion with static flags.
- Test handler methods directly for fast, reliable coverage.
- Apply consistent naming conventions.
- Divide logic by context (
beforeInsert(),afterUpdate(), etc.). - Integrate with frameworks like fflib Apex Common for large-scale projects.
Common Mistakes and How to Avoid Them
- Duplicate triggers on the same object.
- Hardcoding business rules directly in triggers.
- Ignoring bulk testing scenarios.
- Forgetting recursion control mechanisms.
- Skipping test coverage on handler methods.
Most pitfalls vanish once teams commit to the Trigger Handler Pattern in Apex Salesforce and enforce one-trigger-per-object with bulk-safe patterns.
Testing the Trigger Handler
@isTest
private class AccountTriggerHandlerTest {

    @isTest
    static void testHandleBeforeInsertOrUpdate() {
        Account acc = new Account(Name = 'Test Account', AnnualRevenue = 2000000);
        insert acc;

        Account updated = [SELECT Industry FROM Account WHERE Id = :acc.Id];
        System.assertEquals('Technology', updated.Industry);
    }

    @isTest
    static void testHandleAfterInsert() {
        Account acc = new Account(Name = 'Log Test Account');
        insert acc;

        Account_Log__c log = [SELECT Name FROM Account_Log__c WHERE Name LIKE '%Account Created%'];
        System.assert(log != null);
    }
}
Conclusion
The Trigger Handler Pattern in Apex Salesforce is a foundation for clean architecture: it keeps triggers lean, centralizes rules, and simplifies long-term maintenance. Implementing this pattern early in your Salesforce projects prevents technical debt and promotes scalability.
Use this guide as your reference when refactoring legacy code: start small, introduce a handler, and expand coverage. Over time, your org will reflect consistent Trigger Handler Pattern in Apex Salesforce practices across every object.
For related architecture topics, see our article on email automation design, which pairs well with the Trigger Handler Pattern in Apex Salesforce.
And check out the official Trailhead module on Apex Design Patterns for further learning.
Leave a Reply